


 |
| The Chinese and Chippendale dining room. |
All the windows, doors, and trim in the room are painted Delta Creamcoat Village Green unless otherwise noted. The ceiling and medallion are painted white!
This room opens front and back which added complexity to the build. It also made it interesting to run tape wire--which ended up being a long run from the living room through to the dining room with cross pieces at desired points to go to the walls. Early on, I learned that I cannot neatly run tape wire on the walls or ceilings, so I don’t. Ceiling lights are connected to tape wire on the floors of the rooms above and I don’t use sconces. I learned to accept my limitations and move on. After all, this hobby is supposed to be fun!
I like to continue the wall treatments onto the end of the interior walls and onto the exterior doors of the dollhouse.
 |
| Exterior wall follows the design of the room. |
This room went fairly smoothly. We appreciated this after the excitement of the foyer staircase (previous posts).
Plan of this floor:
 |
| Floor Plan of 1st floor. |
We made the room open front and back mainly because it’s fun to open the front and look to the rear French doors, and then opening the back and looking through to the front Palladian windows. I guess I worked so hard making these windows I wanted to look at them every which way!
And, of course, it is easier to fix things at the rear of a 25” deep room if you can easily get to it.
 |
| Open front door and look toward French doors at rear of room. |
 |
| Open rear door and look toward the Palladian windows at the front of room. |
The wallpaper is a retired wallpaper by MiniGraphics and the wainscot is scrapbook paper. The vendor only had three sheets of the wallpaper! Fortunately, the wallpaper went on with no mishaps. I used YES glue and I put the glue on the walls. I use this technique because if I put paste on the paper, I usually glue the paper to itself! Since I have been using this method, I have discovered that other miniaturists do it also.
The chair rail is actually one of the HBS small picture frame strip wood.
 |
| Small picture framing as chair rail. |
The baseboard is HBS standard baseboard. Both are painted Delta Creamcoat Village Green.
Fireplace and mirror:
I made the fireplace inspired by the style of one I liked in one of the Thorne Rooms.
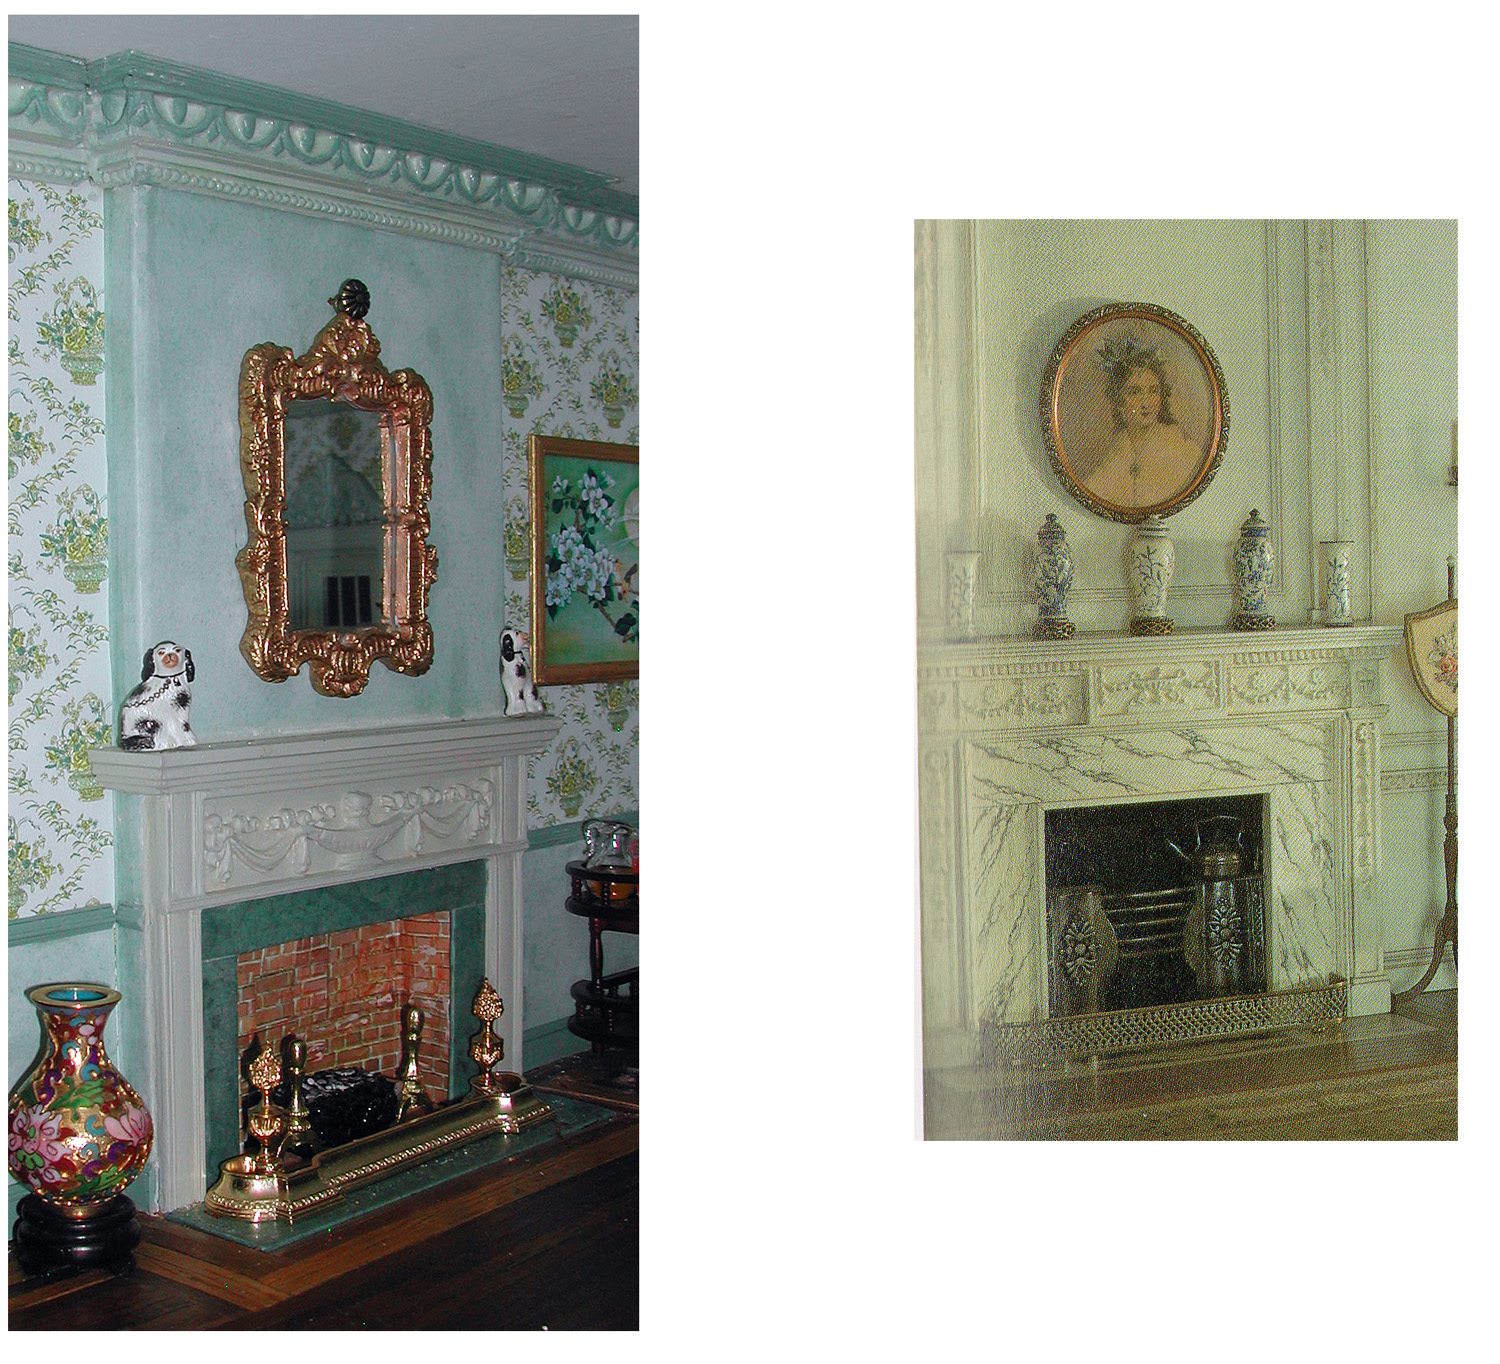 |
| Mine and Mrs. Thorne's |
The firebox was deepened by cutting a hole in the plywood and then the hole was covered on the exterior of the house with a piece of thin plywood. The bricks are a plasticized brick paper from Noch.
I don’t know the maker of the fire fender except it is gorgeous and was expensive. I was hesitant about buying it but my husband said “the little people have to have it”, and Derek and Rebecca agreed!
 |
| It's ours! Iris is so clever at finding nice things and she is so generous! |
The floor in this room was too large for one sheet of flooring, so I added the “trim” strips to increase the size. The flooring is a combination of the HBS wood flooring sheets in red oak (stained MinWax Provincial) and black walnut, and then sealed with two coats of gloss MinWax polyurethane with a light sanding between coats. This is a very easy design to make and is very effective, and it was not difficult to go around the fireplace.
 |
| Flooring of black walnut and red oak. The candlestick lamp on the server is by Clare-Bell. |
Lighting:
The chandelier is from HBS and the medallion is from Unique Miniatures.
 |
| Chandelier and medallion. |
Crown Moulding:
This is from Unique Miniatures and painted Delta Creamcoat Village Green with Poetry highlights. I added a strip of HBS casing at the top of the moulding and glued onto the ceiling to add a bit of pizzazz.
The resin moulding is very beautiful but bulky, heavy, and difficult to cut and glue onto the walls, and very difficult to miter inner and outer joins! We decided to reinforce the moulding with nails besides the glue on the exterior doors of the dollhouse. I like the moulding enough to use it again.
 |
| Crown moulding with ceiling "extra" stripwood moulding. |
I removed the HBS double doors from their frame and hinged them into my frames. The rear French doors are made by Timberbrook, which seems to be an extinct company-- too bad, they made nice hinged doors. These doors have Unique Miniatures appliqués as pediments.
 |
| French door and double entry door. |
Oh my, these windows! I will devote, at some time, the story of how these were made. If we knew then what we know now! Suffice it to say that they are bashed HBS Palladian doors with Classics 12-light standard windows.
 |
| Take two and bash! |
 |
| The result! |
Furniture:
The furniture is Bespaq. Here is a close-up of that most extraordinary china cabinet filled with Rebecca’s teapot collection:
 |
| Extraordinary china cabinet! |
The artwork is made from Chinese paintings scanned from magazines, books, and downloaded from the internet.
I made the frames from HBS stripwood and painted the frames Delta Metallics Gold. (I described my frame making method in a previous post and will describe it here too.) I wanted a simple frame to show off the artwork, thus I used a simple chair rail wood rather than official frame wood.
 |
| Chinese paintings. |
 |
| Other wall with paintings. The lamp is by Cir-Kit Concepts. |
Making the frames:
Making the frames was a bit tricky because the wood is very small and making a good miter requires a steady hand and a clear eye. I did mess up a few! The thing I found is that you should measure against the picture itself, that is, at least for me—forget the ruler! Also, paint or stain the wood before using it.
The pictures are printed on Kodak Premium Presentation matte finish. I cut them out with lots of white paper around them. I then used a glue stick to glue them to a sturdy, 1/16 inch thick card. When dry, I used matte acrylic gel to protect them.
Then I measured the width of the moulding against each carded picture and cut the picture to that size, leaving a white strip around the picture. I then cut the framing wood by measuring the wood against the picture’s edge. I glued the frame to the picture with a very small amount to glue corner to corner. When all was dry, I carefully touched up as needed. I found this method in Jean Nesbitt’s The Big Book of the Doll’ House, page 81. I love her books!
~~~~~~~~~~~~~~~~~~~~~~~~~
Well, that’s all for now, except that Rebecca said:
 |
"We are sorry you missed our last Christmas party, but you MUST come to this year's party!"
|
I like the name Poetry Green! :D Great idea to have an open front and back. Those windows are amazing. The artwork is perfect with the subtle framing - allows the art itself to shine. Beautiful room!
ReplyDeleteThanks, Otterine.
ReplyDeleteIt is possibly my favorite room in the house. I think that now I will stop fussing with it!
Have a nice day.
I have recently discovered your blog and I plan to examine it thoroughly over a period of time. It must be so nice to work as a team. Your house is magnificent and I love how you fill it with little people. It's so interesting to look at all of them, their hair, their costumes! I'm so happy I found your blog!
ReplyDeleteHi Lucille and my little people welcome you! I am glad you like the little people also. I find it amazing that some miniaturists would never have them in their houses.
ReplyDeleteThank you for the nice comments about my work.
Cheers,
Iris
Hi Iris,
ReplyDeleteI thought the foyer was spectacular but this is definitely equal to it. The use of different shades of green is inspired. That Chinese Chippendale china cabinet and those paintings add so much to the ambience!
Tell Rebecca and Derek that I accept their invitation to the Christmas party!
Hello Iris March!
ReplyDeleteYour Dining Room is lovely! I am a fan of that "Fireplace Fender". I purchased one of those from Sue Cook many years ago for a roombox and decided to keep it. Yours looks great in this room. I particularly like your creative use of architectural elements and picking them out in different colors. The size of the furniture and the placement of each piece makes it obvious that you put a lot of time and thought and work into this wonderful room. Can I come to the "Party"?
Warm regards from Ray
Hi Iris, thanks for the email. I have been tied up with work etc and not been able to fully appreciate your hard work yet.
ReplyDeleteWhat a wonderful room, I love that you have taken inspiration from Mrs Thorne for the fireplace. You have done a great job of replicating it. I am a BIG fan of different openings to houses and fully appreciate the fact that both ends of the room open. The two different views are wonderful and you can so much more detail.
As you know, I am a great lover of Chippendale, especially the Chinese style. The oriental details in the room really tie it together and make it so interesting.
Good work on the windows, byt the way. It has really paid off. It can be so difficult finding the things you want that very often we just plump for what we can buy and change the plans around that. It takes a lot of skill and nerve to do what you have done.
Fabulous work, I look forward to the next Post.
Best wishes
Simon
Hi Iris! This is A MAGNIFICENT room! I am Awestruck by the scale and intricacy of your Creation! You have a Wonderful collection of Chinoiserie.... and I am SO Glad to know that I am NOT the only one who used those Christmas Ornaments for Dollhouse Mirrors!
ReplyDeleteThe party looks INSPIRED!
What an amazing, information pack-filled Blog Iris! A new follower and so much to read...love it! Jazzi
ReplyDeleteWow, thank you all for those wonderful comments! And you all are definitely invited to the party!
ReplyDeleteRay- I have been fussing with this room for many years, but finally I can stop and be satisfied.
Simon- Those Palladian windows and doors came out well (mostly-- the story is a good one for a night at the pub WITH a drink!) Of course, now, I am braver and know more, so it should go easier! hmmm...
Daydreamer -- I use all sorts of things! I have those mirrors in a number of my houses-along with other Christmas ornaments and other oddments.
Jazzi -- by the way, my license plate is "Jazy"! I think that a big part of this hobby is sharing infomation. I have learned so much from other miniaturists and I really enjoy passing along anything I learn (the easy way or the hard way). Nobody should have to "go it alone"
Hello Iris,
ReplyDeleteI hope you are doing well. WOW! I really don't know what I love the most. The room is stunning. I think you did an amazing job on trim detail. The cornice is spectacular, The fireplace is perfect, I love the wallpaper. The floor came out very well.
Also, great job on bashing the windows. They look awsome!
I also have to mention I really like the way you furnished the room. The furniture all works together very well and I think you placed everything just right.
I't great to see a dollhouse with rooms that big. It really enables you to go Grand.
I LOVE it!
Your work really is a source of inspiration. Keep up the great work, and thanks for the detailed post.
Hugs,
Giac
Hi Iris, I am so glad you met my blog and I could meet yours. Your work is awesome and I went through your blog only to find it more and more interesting as I read it.
ReplyDeleteI'll come back at any post you'll write. Rosanna
Such a pretty room! The green is such a lovely background for your beautiful pieces. Mrs Thorne would be proud of your fireplace --(I confer with the old gal routinely on the decoration of Merriman Park and I've become familiar with her inequitable taste). Iris, I could have sworn I joined your blog ages ago, but whatevs, I signed up again and look forward to more, more, more!
ReplyDeleteLove, Love, Love this house! Very pretty. Especially since green is my favorite color. Your work is wonderful! So cozy and inviting! I love the oriental pictures. I have never seen any like that before.
ReplyDelete