


It's really weird, but:
It's odd and a little difficult doing this house because for all the previous dollhouses we had the occupants, their names, their family trees, and a whole background for their lives. This house is still unoccupied and we can't find the "right" people to live in it. I know this sounds like a weird problem, but it's like working in the dark! I know ... we are just strange.
 |
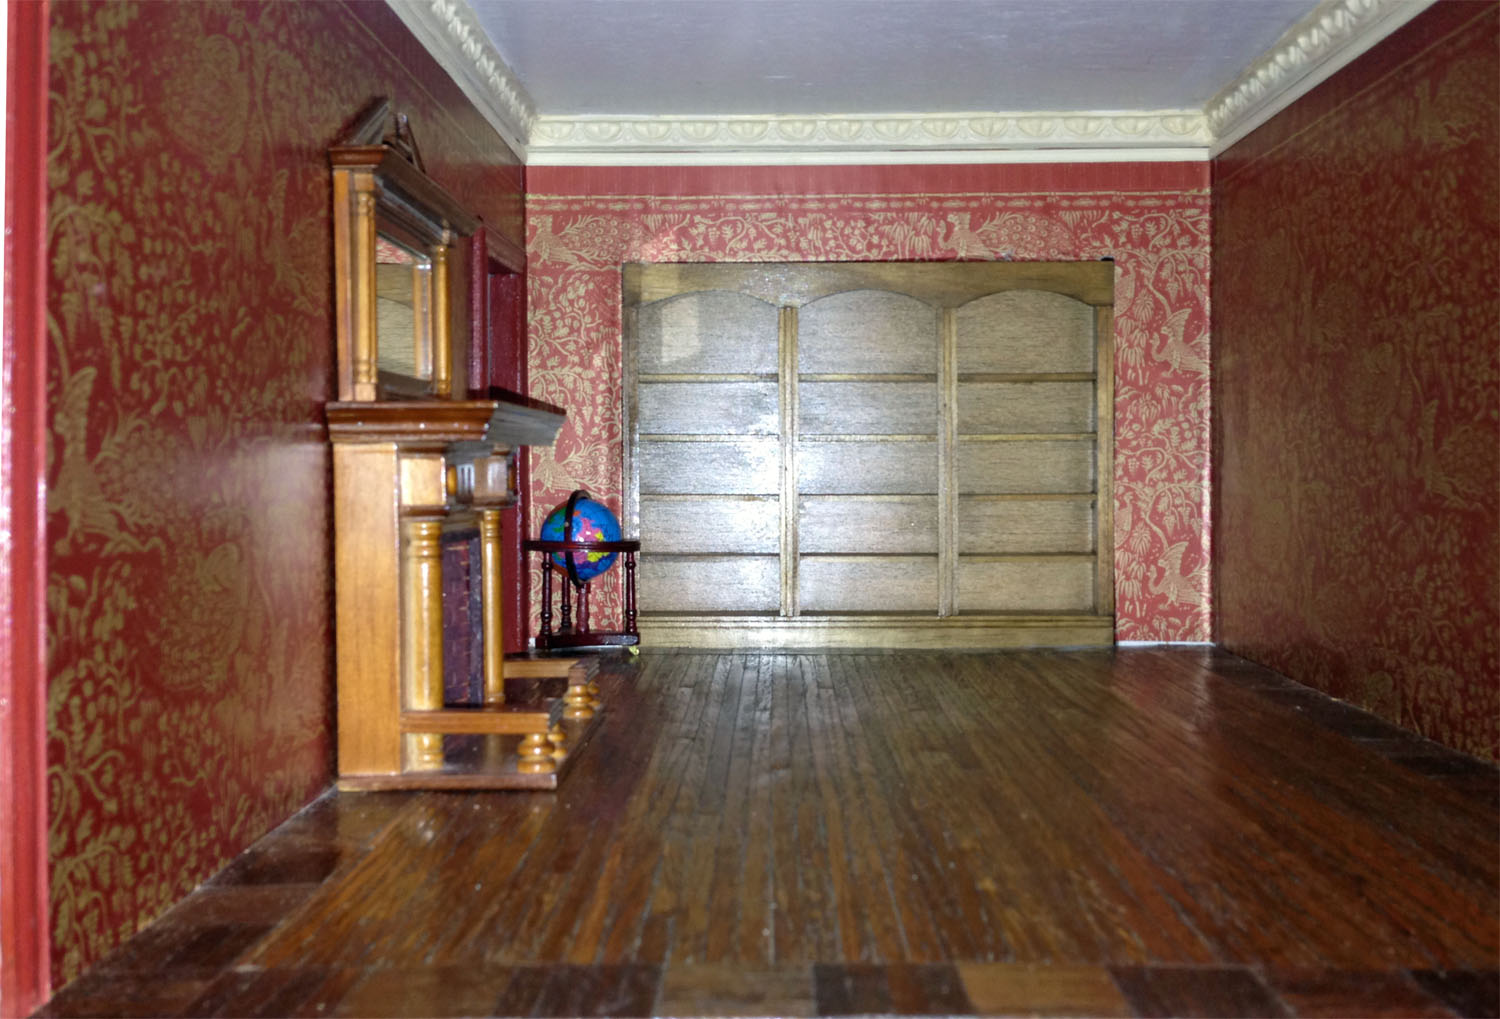
| Montclair - Dining room and Foyer |
Love-Hate Unique Miniatures Architectural Items (UM):
I use a lot of UM items and I will continue to use them. I just hope that someday they get better quality control, or have someone explain to me why this can't be done.
--Love:
*They have a wide range of resin crown moulding, medallions, and many other architectural elements.
*They have about 30 different styles of crown moulding. Their crown moulding is almost 18" long! For those of us who build large dollhouses, this means less joining.
*Their items are relatively inexpensive, made in the USA, and are easy to find--especially when you need some pieces in a hurry.
*They can be painted well, curved when heated, sawn (get hot with a power saw), and glue well ( I use DAP Clear household caulking). If a piece breaks, it is easy to glue back together and plaster can be used to fill in spaces.
--Hate:
-What happened to having manufacturing specs?
-What happened to consistency of size of crown moulding in the dimensions away from the wall and down the wall? The dimensions of a piece can vary greatly as it goes form one end to the other. This makes joining pieces difficult and sometimes impossible without a lot of work.
-Sometimes the pieces have lumpy backs so that they have to be sanded to lie flat against the wall or ceiling, or are curved so that have to be forced to lie straight.
Enough said ...
~~~~~~~~~~~~~~~~~~~~~~~
Now the Montclair progress:
--The Foyer:
I feel like a great magician getting a curved staircase to look like it belongs and no problems in a room only 8" wide! Actually, there were problems and it took considerable time to get it to go against the curved wall up to the second floor and look as if it "connected" as it should into a 2nd floor hall that was all of 8 1/2 " wide!
 |
| Foyer with a curved staircase in only an 8" wide room! |
I had to lengthen the bottom three steps to get them to meet the wall—added a little wood and perfected it with plaster. (For little things and to get into little spaces, I use DAP “pink” spackle in the tube.) The curved section for the bottom step is a piece of ¾” dowel cut in half and glued on. The “bullnose” for the steps was made from Elmer’s wood filler, rolled into spaghetti, let dry a while, and then cut, shaped, and glued onto the steps with Elmer’s wood glue. The stair treads were painted to hide all the patches.
The spindles are waiting to be glued into holes drilled into the treads (holes made by the manufacturer); the posts are pinned and glued in place.
The curved wall only goes to the second floor and then makes a ledge. I am hoping to find some interesting, and perhaps lighthearted curios to go on the ledge.
The wallpaper is a very pleasant stripe to bridge the living and dining rooms. It had no manufacturer’s name. The frieze at the ceiling is an embossed stripe from real-house wallpaper and gives a good impression of plaster-work. The adjoining stripe was used along the ceiling. It was very easy to glue to the curved wall!
The flooring is a high-gloss alabaster marble tile sheet. I toned down the gloss with a coat of semi-gloss acrylic gel medium.
All the trim in the room was painted Delta Creamcoat Magnolia White.
The foyer needs baseboards, and perhaps a chair rail, a medallion and chandelier, maybe some sconces, and a bench or settee, and a wall-hung console table. We already have Bespaq’s Portia curio console for the back wall.
--The Living Room:
The living room is 13 ½” x 18” with 10” ceilings.
 |
| Living room with gorgeous wallpaper and everything! |
From the items designated for this room, it appeared
somewhat toward the Victorian. We tried to keep it this way but added furniture
pieces and a UM trim for the door casing that would give it a light
Victorian-eclectic look. The room still needs a rug.
All the trim in the room was painted Delta Creamcoat Magnolia White.
The wainscot was purchased from Lawbre. I added the standard wood baseboard from HBS (#7042) and found a great chair rail in the
supplies that came with the house. I love the wallpaper but I thought that it
over–powered the room, thus the wainscot.
The crown moulding is UM
#UMM9, which needed very little correction since I found three pieces that
matched in size! I decided not to do miter joins, but cut the back piece straight
and then coped the adjoining side pieces. It did need a bit of plaster fill-in
at the joins. |
| Base trim for door casing |
 |
| UM and quarter-round wood moulding for door casing fits in nicely with Lawbre wainscot. |
 |
| Victorian fireplace |
 |
| Living room furniture "somewhat" where it may be finally placed. |
The door casings for all the rooms on this floor were made from UM #UMM3 with basswood 1/4” quarter-round trim from HBS, and all done the same way. I wanted the door casings to be deeper than the living room wainscot, so I used the following method. I cased the openings with 1/16” x ½” basswood on three sides as a base, and then glued the UM trim on the room side and the foyer side. The quarter round was used to hide the edge along the wall and to add some more interest.
The door casings needed a lot of UM trim, and needless to say that even with the large supply at hand, it took quite a while to find similarly sized pieces. After the trim was dry, I looked for places that needed some plaster fill-in, and then a quick, careful touch-up with the Magnolia White. The wallpaper is very striking but had no manufacturer’s name.
I gave the flooring wood a light coat of MinWax Provincial before using it. I put the floor together on illustration board: I inch band of Houseworks Black Walnut and Pine strips cut from the flooring sheets, 1” squares of black walnut parquet from Handley House, one strip of pine, and then a central area of black walnut.
I glued the wood down with a glue stick but it has started to unstick itself—fortunately in just a few places. I have had good success using UHU glue stick but didn’t have any on hand so I used a Staples glue stick. I don’t think it is as good! I guess I will go back to standard Aileene’s or Elmer’s glue. When the glue was dry, I sanded and put on another coat of Provincial and then sanded again, and then 2 coats of MinWax satin varnish.
The Victorian style fireplace is made by Concord. It is a deep fireplace and I decided that it was too deep for the room. Thus I cut out the shape of the fireplace out of the plywood exterior wall and pushed the fireplace through to the depth I wanted. The exterior chimney will cover the "excess". I made the fire (came with fireplace) more realistic by sprinkling red Mylar "sprinkles" over glue I painted on the coals.
--Dining Room:
The dining room is 13 x 18”.
 |
| Dining room, almost finished. |
 |
| Fireplace (The blues do match, but do not photograph very well.) |
 |
| Dining room with its furniture, so far |
 |
| Dining room with its furniture, so far. This photo has the truest blue colors found in the room. |
This room has the same door casings as the foyer and the living room, but painted Delta Creamcoat Icy White (looks more like an “Icy Blue” than “Icy White”, oh well...).
The crown moulding, UM #UMM7, was not too hard to line up, but needed some sanding on the back. It was painted Delta Creamcoat Magnolia White, as will the chair rail if I use one. The baseboards will be painted Icy White.
I was going to put the same wainscot in here as the living room, but I so loved the look of the long flowery stripe pattern that I decided to let it all show. The paper is Mini Graphics Blue Symphony. I have to admit that I was so panicky that I wouldn’t get the stripes vertical that I glued the paper to Bristol board first so I could stare long at it before gluing the board in place, or do another if I messed it up!
The resin fireplace is lovely (Aztec). I painted it in colors to match the room. The firebox is made from piece of cardboard painted with red stone textured paint (no longer being made) and when almost dry, I scribed in the bricks. When dry, I cut it to fit and glued it in place. The fireplace has its depth because I cut a hole in the plywood wall. The hearth is Model Builder’s Supply (MBS) (styrene) marble squares.
The dining room connects to the kitchen in the addition.
~~~~~~~~~~~~~~~~
~~~~~~~~~~~~~~~~~~~~~~~~