It All Starts Here

Sometimes our ideas flow from an existing kit to bash, a house style to scratch (aka custom) build, or from an interesting doll who needs a place to live. Our settings are always modern-day (ca. 2001 when we started this hobby). We try to create things that will make people smile and feel good.

We think that if we had to build the same house twice, we literally could not do it! Fortunately, we have very unique little people who have definite opinions and so far, no one has wanted a house “like so-and-so” has.

We work as a family unit: my wonderful husband, my beautiful sister, and I. We don't always agree as to the direction of the build, but I think that we end up with a better dollhouse because of all our grumblings -- and we do have a lot of fun!

The Purpose of this Blog

We needed a place for all we wanted to say about the background of the build and the nuts and bolts of the design and build process. Thus this blog.

All our dolls' homes have families living in them and a story is built around their personalities and lifestyles. This story is an integral part of our building process. We would like to share these stories -- actually, the little people insist upon it!

Many of our houses are located in Fredericksburg, Virginia because that is my sister's favorite place.

Also, we have started a Rouges' Gallery with photos of our little people and information about the dolls.

If you would like to start with the dollhouse that "started it all", it is the Original Rowbottom Manse; if you would like to see the scratch-built Georgian that our first build gave us the confidence (or fool-hardiness) to do, it is Sunnybrook Farm.

Let the stories begin!

~~~~~~~~~~~~~~~~~~~~~~~~~~~~~~~~~~~~~~~~ ~~~~~~~~~~~~~~~~~~~~~~~~~~~~~~~~~~~~~~~~

Friday, February 24, 2012

Interior Design- The Living Room: Sunnybrook Farm

The living room looking back toward the Palladian Doors to the terrace.
After the excitement of the curved staircase bash in the Foyer posts, and the elegant Chinese Chippendale Dining room post, the Living room post is positively calm!

We are still looking for the right items, here and there, for this room. It is complete but I want a few more “somethings”. Let’s see, both the dining and living rooms were started (according to my notes) October 2003 and almost completed by mid-2005. It took until now to make the dining room “complete”, so hopefully we can also “complete” the living room shortly?

Plan of this floor:
We are in the starred room

To Begin:
The living room is 15 x 25 with 11 inch ceilings. The living room is done in a Chinese and Chippendale style. This is basically an “orange” room with a number of soft oranges in use: the scrapbook and foil papers, and the paints: Gidden Peach Pavilion (Home Depot real house paint) for the walls, Delta Creamcoat Dunes Beige, Eggshell, Copper, and Gold for the accents. The ceiling and medallion are painted white!

This room opens front and back which added complexity to the build. It also makes it interesting to run tape wire, which ended up being a long run from the living room through to the dining room with cross pieces at desired points to go to the walls.

I like to continue the wall treatments onto the end of the walls and onto the exterior doors of the dollhouse.

Room treatment continues to the exterior door
Why doors opening front and back:
We made the room open front and back mainly because it’s fun to open the front and look to the rear French doors, and then opening the back and looking through to the front Palladian windows. I guess I worked so hard making these windows I wanted to look at them every which way! And, of course, it is easier to fix things at the rear of a 25” deep room if you can easily get to it.

Looking back toward the Palladian doors to the terrace.
Looking front to the Palladian windows.
Walls:
Orange is my favorite color so we decided that Rebecca and Derek would have an orange living room. My sister found the gorgeous coppery foil (not so easy to work with) paper and we decided that it would make a wonderful wainscot.


Copper foil "paper".
Thus the paint colors are Gidden wall paint “Peach Pavilion” (Home Depot), Delta Creamcoat Dunes Beige, Eggshell, Copper, and Gold. The paint color to “match” the foil paper is a Copper base with a Gold overcoat and is used in the crown moulding and the baseboard. The chair rail is painted Dunes Beige. The chair rail is actually one of the HBS small picture frame mouldings. I simply liked it better than “official” chair rails for this and the dining rooms.

Chair rail from picture frame moulding
The baseboards are HBS standard baseboards.

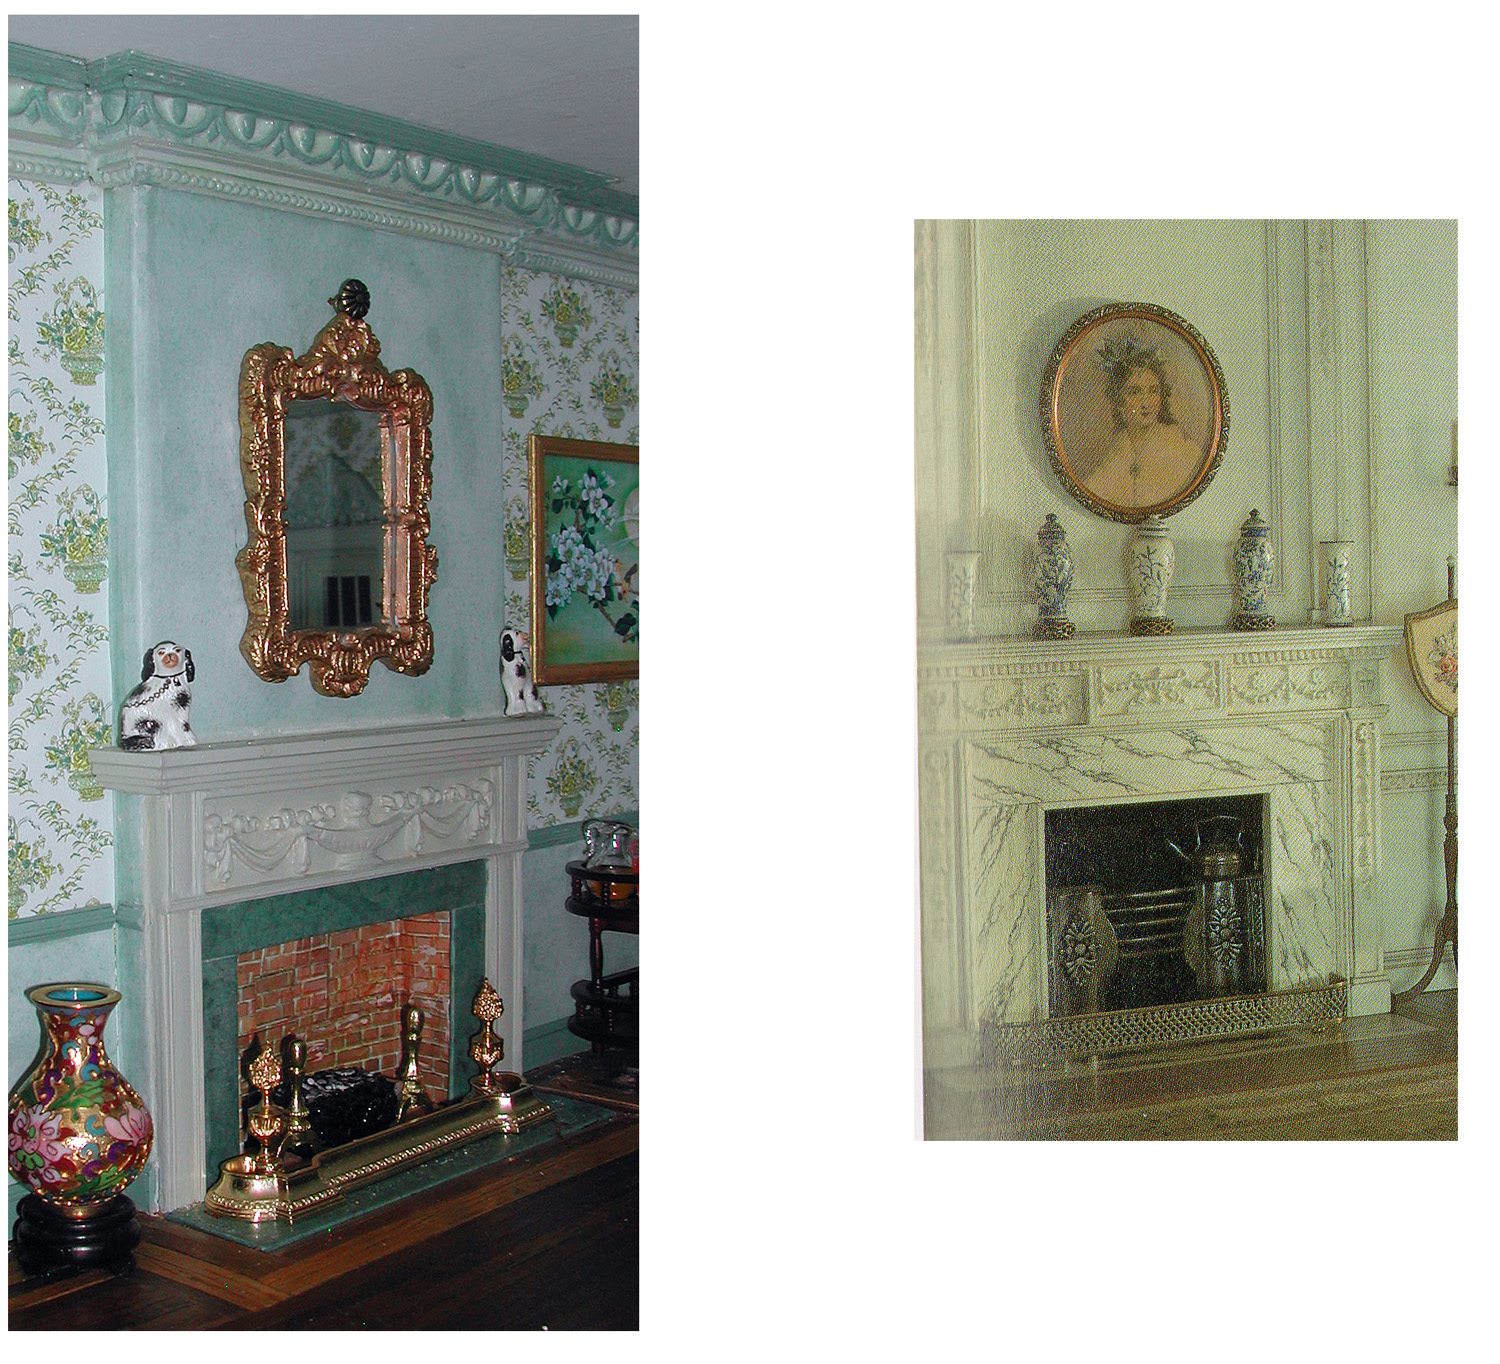
 Fireplace and Mirror:
I love the fireplace in my real living room – so classic Georgian: dentil and dog-ears. I decided to copy it in miniature for the living room. It went fairly smoothly except when I had to concoct some trim moulding because it didn’t exist in miniature. It is a composed of UM resin and HBS wood mouldings, and a curved piece under the dentil that I had to create. The fireplace was constructed flat and then placed in the room.

Rebecca's fireplace on the left; mine on the right was the inspiration.
The fireplace is painted Eggshell.

The “marble” is a varnished orange and white marbled scrapbook paper.

The firebox was deepened by cutting a hole in the plywood and the hole was covered on the exterior of the house with a piece of thin plywood. The bricks are a plasticized brick paper from Noch. We found a very nice fire fender (and less expensive than the one in the dining room).

Oh yes, it is a very nice fire fender, but ... hmm....  Do you think we could have an upgrade?
Surprise, the mirror above the fireplace is not a Christmas ornament! It is a beveled mirror from Michaels and it fits perfectly in the space above the fireplace. I love mirrors above fireplaces.

Flooring and rug:
The flooring is HSB red oak stained MinWax Provincial and then sealed with two coats of gloss MinWax polyurethane with a light sanding between coats. I cut the sheets into 1 ½ inch squares and glued them at an angle to a brown poster board template. This was time consuming but fun, and let us has a parquet floor without the pain.

Parquet flooring and "antique" rug.
We found this wonderful old rug that is supposed to be a copy of an antique. I am trusting, so I believe it, but it doesn’t matter—wonderful is wonderful! The flooring is not permanently glued down because the ceiling lights on the ground (basement) floor are bradded (if there is such a word) into the tape wire on the living room floor.

Lighting:
The chandelier is from HBS and the medallion is from Unique Miniatures. The ceiling medallion is painted Eggshell.
Chandelier and ceiling medalion.
 The two fireside table lamps are from Miniature House.

Crown moulding:

Custom crown moulding.
It was really fun to make up our own composite design for the crown moulding using various available mouldings: Unique Miniatures medium Egg and Dart, HBS Dentil, and a simple HBS chair rail moulding at the bottom.The moulding is painted in Dunes Beige and Peach Pavilion, with an extra-interest moulding (an HBS window casing) painted Copper overcoated with gold and glued against the ceiling:

The extra-interest moulding glued onto the ceiling.
This was a late addition when I decided that I liked the crown moulding colors but that the color looked a “little flat” at the ceiling. Now we have pizzazz!

Doors:
I love “dogs-eared” moulding around doors, and it goes well with the fireplace’s dog-ears. I made the casing from various stripwood and trims. Both the double entry doors and the hallway to the music room have it. (Do you know what it was like to miter the tiny moulding when I was doing the dog-ear part?). At least I did one smart thing in making the door trim outside the house and then glue it around the doors.

Entry double doors on left; doorway to music room on right.
The double doors are HBS double entry doors. I removed them from their frame and put them into my own with hinges. The appliqués are by Unique Miniatures.

The Palladian doors to the terrace are made by bashing HBS Palladian doors with Timberbrook French doors. (Timberbrook seems to be out-of-business which is too bad because they made wonderful doors and windows.) Making these doors was a time-consuming task and I thought I would not finish them with my sanity intact. (The house needed six of them.) And yes, I now know there is a better way.
Take one HBS Palladian door.
 
 
and one Timberbrook French door

The result -- one custom Palladian door!
Windows:
The windows are bashed HBS Palladian doors with Classics 12-light standard windows. Actually, the windows really weren’t too bad to make—it was the Palladian doors that caused one of the work stoppages on this house. The windows and doors are painted Dune Beige.


Furniture:
The furniture is mostly Bespaq and whatever other pieces struck our fancy. We are not purists—what we like, we like. Two of our favorite Chinese pieces are a “prayer or ancestor” table and the white chinoiserie cabinet:

"Prayer" table

Cabinet
Derek and Rebecca love this entire room and we do too. I am a Chippendale and Chinese “nut” and I wish I had as much as Derek and Rebecca. Sigh …..

Artwork:
My sister found the Chinese emperor and empress pictures. The Buddha picture is by Jim Coates.

Emperor and Empress paintings.
I found the horse painting as a freebie download on the internet and framed it with an HBS frame moulding painted Delta Creamcoat Gleams Metallic Gold. I love this gold paint – it glistens! I would like something on both sides of the horse painting, but I can’t think of exactly what, perhaps just two long but narrow hangings?

Horses and groom.
 Also, I like Monet’s Sunflowers, and the color is right, but I don’t know if it’s in the right place over the white chinoiserie cabinet (shown in a previous photo). (A discussion of creating artwork and frames was given in the previous Dining Room post.)
Rebecca and friends discuss where to hang this picture.
The room is almost “just right”, but to paraphrase Sherlock Holmes: “Come Derek and Rebecca, the game’s still afoot!”

Well, that’s all for now. When Derek and Rebecca find the finishing touches, I will give an update.

Thursday, February 16, 2012

Interior Design- The Dining Room: Sunnybrook Farm

The Chinese and Chippendale dining room.
The dining room is done in a Chinese and Chippendale style. We tried to design the room as one we would like to have. This is basically a “green” room with a number of greens in use: the wallpaper, the scrapbook papers, and the paints: Delta Creamcoat Village Green, Moss Green, and Poetry Green.

All the windows, doors, and trim in the room are painted Delta Creamcoat Village Green unless otherwise noted. The ceiling and medallion are painted white!

This room opens front and back which added complexity to the build. It also made it interesting to run tape wire--which ended up being a long run from the living room through to the dining room with cross pieces at desired points to go to the walls. Early on, I learned that I cannot neatly run tape wire on the walls or ceilings, so I don’t. Ceiling lights are connected to tape wire on the floors of the rooms above and I don’t use sconces. I learned to accept my limitations and move on. After all, this hobby is supposed to be fun!

I like to continue the wall treatments onto the end of the interior walls and onto the exterior doors of the dollhouse.

Exterior wall follows the design of the room.
For the exterior sections that pull-away, I do not continue the design (pull-aways tend to take abuse).

This room went fairly smoothly. We appreciated this after the excitement of the foyer staircase (previous posts).

Plan of this floor:

Floor Plan of 1st floor.
 Why doors opening front and back?
We made the room open front and back mainly because it’s fun to open the front and look to the rear French doors, and then opening the back and looking through to the front Palladian windows. I guess I worked so hard making these windows I wanted to look at them every which way!

And, of course, it is easier to fix things at the rear of a 25” deep room if you can easily get to it.
Open front door and look toward French doors at rear of room.
Open rear door and look toward the Palladian windows at the front of room.
Walls:
The wallpaper is a retired wallpaper by MiniGraphics and the wainscot is scrapbook paper. The vendor only had three sheets of the wallpaper! Fortunately, the wallpaper went on with no mishaps. I used YES glue and I put the glue on the walls. I use this technique because if I put paste on the paper, I usually glue the paper to itself! Since I have been using this method, I have discovered that other miniaturists do it also.

The chair rail is actually one of the HBS small picture frame strip wood.

Small picture framing as chair rail.
I simply liked it better than the official chair rails for this room.
The baseboard is HBS standard baseboard. Both are painted Delta Creamcoat Village Green.

Fireplace and mirror:
I made the fireplace inspired by the style of one I liked in one of the Thorne Rooms.
Mine and Mrs. Thorne's
The marble is a scrapbook paper. The mirror is a Christmas ornament. The fireplace was painted Delta Creamcoat Moss Green, and on the wall is another scrapbook paper.

The firebox was deepened by cutting a hole in the plywood and then the hole was covered on the exterior of the house with a piece of thin plywood. The bricks are a plasticized brick paper from Noch.

I don’t know the maker of the fire fender except it is gorgeous and was expensive. I was hesitant about buying it but my husband said “the little people have to have it”, and Derek and Rebecca agreed!
It's ours! Iris is so clever at finding nice things and she is so generous!
Flooring:
The floor in this room was too large for one sheet of flooring, so I added the “trim” strips to increase the size. The flooring is a combination of the HBS wood flooring sheets in red oak (stained MinWax Provincial) and black walnut, and then sealed with two coats of gloss MinWax polyurethane with a light sanding between coats. This is a very easy design to make and is very effective, and it was not difficult to go around the fireplace.
Flooring of black walnut and red oak. The candlestick lamp on the server is by Clare-Bell.
The flooring is not permanently glued down because the ceiling lights on the ground (basement) floor are bradded (if there is such a word) into the tape wire on the dining room floor. If there is a wiring problem, I need to get to it.

Lighting:
The chandelier is from HBS and the medallion is from Unique Miniatures.
Chandelier and medallion.
The room also has a candlestick lamp from Clare-Bell and a table lamp from Cir-Kit Concepts.

Crown Moulding:
This is from Unique Miniatures and painted Delta Creamcoat Village Green with Poetry highlights. I added a strip of HBS casing at the top of the moulding and glued onto the ceiling to add a bit of pizzazz.

The resin moulding is very beautiful but bulky, heavy, and difficult to cut and glue onto the walls, and very difficult to miter inner and outer joins! We decided to reinforce the moulding with nails besides the glue on the exterior doors of the dollhouse. I like the moulding enough to use it again.
Crown moulding with ceiling "extra" stripwood moulding.
Doors:
I removed the HBS double doors from their frame and hinged them into my frames. The rear French doors are made by Timberbrook, which seems to be an extinct company-- too bad, they made nice hinged doors. These doors have Unique Miniatures appliqués as pediments.
French door and double entry door.
Windows:
Oh my, these windows! I will devote, at some time, the story of how these were made. If we knew then what we know now! Suffice it to say that they are bashed HBS Palladian doors with Classics 12-light standard windows.
Take two and bash!
The result!
Actually, the windows really weren’t too bad to make—it was the bashed Palladian doors to make my version of a Palladian door that caused one of the work stoppages on this house.


Furniture:
The furniture is Bespaq. Here is a close-up of that most extraordinary china cabinet filled with Rebecca’s teapot collection:
Extraordinary china cabinet!
Artwork:
The artwork is made from Chinese paintings scanned from magazines, books, and downloaded from the internet.

I made the frames from HBS stripwood and painted the frames Delta Metallics Gold. (I described my frame making method in a previous post and will describe it here too.) I wanted a simple frame to show off the artwork, thus I used a simple chair rail wood rather than official frame wood.
Chinese paintings.

Other wall with paintings. The lamp is by Cir-Kit Concepts.
It was good to find pictures that I liked and that added to the room’s look.

Making the frames:
Making the frames was a bit tricky because the wood is very small and making a good miter requires a steady hand and a clear eye. I did mess up a few! The thing I found is that you should measure against the picture itself, that is, at least for me—forget the ruler! Also, paint or stain the wood before using it.

The pictures are printed on Kodak Premium Presentation matte finish. I cut them out with lots of white paper around them. I then used a glue stick to glue them to a sturdy, 1/16 inch thick card. When dry, I used matte acrylic gel to protect them.

Then I measured the width of the moulding against each carded picture and cut the picture to that size, leaving a white strip around the picture. I then cut the framing wood by measuring the wood against the picture’s edge. I glued the frame to the picture with a very small amount to glue corner to corner. When all was dry, I carefully touched up as needed. I found this method in Jean Nesbitt’s The Big Book of the Doll’ House, page 81. I love her books!

~~~~~~~~~~~~~~~~~~~~~~~~~

Well, that’s all for now, except that Rebecca said:
"We are sorry you missed our last Christmas party, but you MUST come to this year's party!"

Saturday, February 11, 2012

Interior Design- The Foyer Complete!: Sunnybrook Farm

 Doors to the right go to the living room; rear doors open to terrace.
After the excitement of building the curved "flying" staircase as described in the previous post, the rest of the foyer will seem almost "dull". I hope you all did not miss the excitement!

After the staircase, my helpers were exhausted and left the rest of the foyer to me. Fortunately it went well. We wanted a foyer that was quiet elegance because we had colorful plans (hopefully still elegant) for the dining, living, and music rooms.

The flooring:
Since the staircase was already in place, I had a bit of work to make a floor template.

I decided I wanted a marble floor and found a roll of shelf lining paper that had the colorations I wanted: a mottled creamy blend with a slight surface sheen.

"Marble" colorations are almost right.
I kept the design simple—1 inch squares of “marble” laid in a regular pattern. I marked a grid on the poster board and glued down the squares. I did all the squares except around the stairs. I did this last when I put the flooring in place to do as good a fit as possible in that area. Since then, I have been putting the flooring down first and the staircase on top.

Wallpaper and Paint:
The wallpaper is dollhouse wallpaper, MiniGraphics, I think. I picked a white on white stripe for the greatest effect (I hoped). Here too, I had made the mistake of gluing the staircase in place without at least wallpapering that section first.

The trim paint is Delta Creamcoat Eggshell.

Moulding:
I found a wonderful “swag” moulding by Unique Miniatures, and it came in two smaller “sizes”, which turned out to be needed.

The three swag mouldings
The largest looked great on the long walls but the swags were too wide for the rear wall and did not look good. The second size was just right. It took a long time to find a trim for the ceiling edge above the stairs. Then I found the smallest “swag” and that was it! I glued it “on-edge” around the opening.

Finally, matching mouldings
Doors:
Actually, here was a bit of a problem. I bought the double doors to the dining room and living room from HBS (Houseworks). I planned to remove from their frame and hinge into my own frame.

The problem was that the wood was rather odd with “imperfections”. I don’t know what wood was used, but even with a filler-sealer, the wood did not stain well with the mahogany MinWax stain I used. I put on a couple of coats, trying to even it out. It finally looked “reasonable”. I would really like to replace them at some time. (The doors do look better in “real-life” than in the photo, though.)

The hinging went well except I had to first sand off the curve on the edge of the door (the “pins” side). I even managed to mortise-in the hinges! Of course, I kept losing the brads for the hinges.

The doors and their moulding: Ionic half-columns and a classic pediment.
Door Trim:
I had a lot of fun here. Two Ionic half columns hold up a pediment made from Unique Miniatures “Classic” moulding. Cutting the two end “turn-around” pieces was a pain because the pieces needed were small.

 The Ionic columns are from a local craft shop (baking section). I cut them in half with my band saw.

Chandelier:
12-Arm Grand Chandelier by Cir-Kit Concepts.

Brass chandelier
Furniture:
The foyer didn’t need much furniture. The chair, settee, and tables are Bespaq. The magnificent Chinese mahogany mother-of-pearl screen was found by my sister. My sister had the knack of finding the most wonderful things.

Bespaq furniture
Chinese mother-of-pearl inlay screen.
The foyer is finished! Hallelujah!
~~~~~~~~~~~~~~~~~~~~~~~~~~~~~~~~~~
And a preview of the next room to be discussed: the Chinese and Chippendale Dining Room:
View into the dining room.