


 |
| A room for Christopher--expanding the attic. I built a two-room attic to replace the orginal "non-attic", and stairs to go to it.. |
Why, oh, Why?
A word about this dollhouse, why I bought it, and why I am trying to modify it and still keep it in the “mode” of the original structure.
This is a commercial dollhouse of a kind I have seen advertised as “Quick Build”. The whole house is finished; one just slips the pieces into groves, screws on the door hinges, and plays with it. I am sure many children were very happy to receive this house.
 |
| Original roof with "non-attic". I stuccoed the exterior of the house over a glossy white enamel paint.. |
Well, then, you ask: “Why am I fussing with it?” I am just trying to make a few changes that the home owners, Dorothea and Ned Rumford want. (Always blame someone else!) The idea is to keep the nostalgia I felt about the house when I first saw it, but just add a thing or two. No going off on the deep-end stuff here—keep it simple.
 |
| Ned and Dorothea read off the list of changes to be made to the house. |
Behind the Build: 2004 Odd Job Lane (Store-bought dollhouse) and Build Update#1 2004 Oddjob Lane exterior upgrade.
A project presents itself:
I always thought the roof on this house was a bit lacking the charm of the rest of the exterior (especially since I gussied it up a bit), but since I had plenty of other things to work on, I just made notes and put it aside.
In the last months, during a “I am disgusted with a lot of things” moment, I was just looking for something I didn’t have to do, but would be interesting, different, and keep me amused--something I could work on, on and off. Of course, Andrew was "willing" to help me!
My eyes fell on 2004 Oddjob Lane and its roof! OK, that was the project—but what was the project? I decided that since my sister had decided that a young child, Christopher, also lived in the house, he should have a bedroom. Now I had a definite project: remove the old roof, and make a Mansard roof with two rooms in the attic. Since the roof (attic floor section) is a complete structure and a separate piece from the first three floors, I could remove the attic and roof, and bring it to my workbench to work on. The house is 3/8” MDF exterior and ¼” MDF interior walls and roof.
The first thing was to investigate the roof composition. I drilled some holes to use to start cutting a small piece out with my jig saw. Once I saw inside, I put my hand and a large hammer in the hole and banged away from the inside. Bingo, the roof top left its base.
 |
| The original roof is off! Now we can begin! |
The next thing to decide was how to cut into the third floor ceiling and in the attic floor for the staircase. We decided a straight run staircase would be best (the other floors have “U” turns). This did not leave any room for an attic landing, but since I could enclose the staircase in the attic, no one would know. I did decide on a bit of faux in that the working doors to the two rooms would be on the back walls “implying” that the stairs ended in a gracious, unseen rear hallway.
We tried to make the attic stairs look as much like the existing stairs as possible and this worked out with a minimum of grief (well, sort of...).
 |
| The stairs to the attic from the 3rd floor. |
 |
| Stairs from the 3rd floor poking through the "ceiling". |
 |
| Rooms being glued in place--the bricks and the bulldog binder clips hold the "angle" until the glue dries. The enclosed staircase from the 3rd floor is between the two rooms. |
First, I thought that Christopher would have a bedroom and a bathroom. But then I thought, “oh no, not another bathroom”!
So I decided that Christopher would just have a bedroom and it would be the larger room (11” x 13”) and that the other room would be a "den, library, game room" (11” x 11”). As with all my smaller houses, I first looked in my vintage Shackman stash for furniture. My sister and I loved this stuff and bought (and still buy) it. It tends to be on the “smaller” side of 1:12 scale and fits well into small rooms. Most of ours is well-made, cherry-wood, authentic copies of colonial/Early American furniture.
Putting a den in the attic allowed me to re-work the original den in the main house to make it more like a casual “second” living room.
 |
| I am not quite finished redecorating the casual living room. The lovely rug is from Minibeesknees' shop on Etsy. |
 |
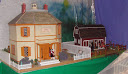
| A picture of the whole house. (Sorry, the picture is crooked, not the house.) |
We bought working, pinned doors from the Wonham Collection (UK). They came beautifully finished in walnut.
--Wallpaper - Christopher:
We chose MiniGraphics “Brownstone” (I don’t know about this name since the wallpaper has a top border of cats, and cat or dog paws prints below). I decided to use the top border at the top of the wall and just use the “paws” as a wainscoting. I used YES glue.
--Wallpaper - Den:
MiniGraphics “Raffina” in blue gave the nicest Colonial look to this room.
--Flooring – both rooms:
To keep with the casual look of the interior finish of the rest of the house, I created a flooring of pine wood-tone Con-tact (vinyl shelving paper). This is something that I have done in other houses: Con-tact stuck to poster board and then cut into random-width strips. I glued the strips directly to the MDF with Elmer’s Glue-All. These strips are also used for the dado and baseboard in Christopher’s bedroom.
--Furniture - Christopher:
The furnishings are Shackman cherry wood trundle bed, dresser, and chest; “cat” chairs from a local dollhouse shop, and a rug and round table from our general stash.
 |
| Trundle bed closed. |
 |
| Trundle bed open. |
The furnishings are Shackman sofa, desk, combination chair-table, candlestand round table, bookcase, and piano stool; and a table lamp from our stash
 |
| Chair-table as chair. |
 |
| Chair-table as table. |
The attic (its roof is still to be finished) has been placed on the house (so I can admire my handiwork). It looks so nice and Christopher is thrilled, and the den has a pleasant, cozy look.
 |
| The den with an Early American look. |
 |
| Christopher's bedroom with an animal motif. |
 |
| Christopher and his friends: Freddy Miller and Juanito Duran, and his wonderful yellow lab, "Mr. Doggie". |
The Mansard roof will have two (yet to be made) dormers, grey slates, and probably a flip-up front. I will have to redo the chimneys.
 |
| House with unfinished Mansard roof. |
I am making the slates. I found a great vinyl “slate” flooring tile at Home Depot. I scanned it into my computer and printed it out on Kodak Premium matte photographic paper. I then glued it onto illustration board with 3M Super 77 Multipurpose (spray) adhesive. When dry, I cut it into 1” x ¾” “slates”. I put a sample on the roof and liked the way it looked. Now I just need about five more sheets to do the roof. It’s time-consuming so I guess I will be "slating" for a while...And before I can even slate the front, I will have to decide on the style of the dormers and their placement!
 |
| The scanning the "slate" tile worked out well. |
In retrospect, while this project is fun it definitely has not turned out to be the smallish, casual project I was imagining!
~~~~~~~~~~~~~~~~~~~~~~~~~~~~
~~~~~~~~~~~~~~~~~~~~~~~~~~~~
Fabulous job, Iris! It's going to look 'seamless' when complete. I love how you come with such clever solutions to your 'design dilemmas!' I bet Christopher is mad for his new room.
ReplyDeleteHave you thought of a triangular gable between the dormer windows, centered on the pillars? :)
Thanks, John and Christopher said to tell you that he loves his new room!
DeleteThe center gable is an intriguing idea. I hadn't thought of that. Thanks, that could solve the situation.
Wow fantastic rooms. Thank you for some wonderful ideas as I have a similar house with wasted space on top.
ReplyDeleteHugs Maria
Certainly this house cried for some different roof and no sense just changing the roof without addding some attic rooms!
DeleteGlad you like the idea.
Iris, you are so clever!!
ReplyDeleteI would never have thought to do that, let alone attempt it and you have done such a wonderful job.The rooms look lovely and Christopher looks like he's having too much fun in there!!
Fi xx
Nothing like having a room to your own when you are growing up! Until I figured out how to get the roof top off its base, I wasn't really sure it could be done.
Deletevoici une jolie maison qui avec son petit plus ajouté : le grenier a gagné un bel espace. Christopher semble très heureux d'accueillir ses amis dans sa jolie chambre spacieuse !
ReplyDeleteThank you so much. I think it added a lot to the house design, besides giving Christopher a room.
DeleteIris!
ReplyDeleteWow, there is nothing you can't figure out! Beautiful job here of adding a whole other floor. That Mansard style roof has much better proportions than the original roof. I love the Shackman furniture! it is perfect for a little boy's room. You certainly have an amazing collection of goodies to furnish your houses with. Great job!
Ray x
Well Ray -- I wish there was nothing I couldn't figure out! But sometimes things surprise me, and a "bright idea" actually is a good idea and I can do it. I never did understand why the manufacturer added that style of roof, even without attic rooms! Thanks for support.
DeleteBravo on the seamless match! It really does look like it was originally part of the building. I especially like the lower flat walls - I had been contemplating something like that for the Newport before I sold it. It really does make a room more useful. :]
ReplyDeleteI was glad to see that I could pull it off. Having an idea and getting it realized are not always possible, but I am pleased with the result. Now I just have to finish it!
DeleteHello Iris,
ReplyDeleteWhat a wonderful job! the rooms look great and I think you did a remarkable job changing the roof. It's great to incorporate amnsard to have that ever so precious extra space. I can't wait to see what the outside looks like when it's all done.
Great job.
Big hugs,
Giac
Thanks, Giac, this is a much better roof! The other one actually came to a point on top--I don't know if that is a real "style" or not, but it did look odd.
DeleteHi Iris,
ReplyDeleteI love all these home improvements you have made, and they just go to show what can be done to adapt kit made houses to suit whatever you want inside.
The new roof makes the house look far more elegant, and the idea for making slates is pure genious!
Well done on all your hard work, it has really paid off here!
regards
Andy xxx
Thanks--it is interesting to use a "quick build" house already built and try to keep the new stuff looking "in sync" with the rest of the house. I am in a little bit of a quandary with the style of the dormers--so things have slowed down a bit.
DeleteWOW! Love how you made more space. I am working on the half scale Victorianna now (McKinley's half scale version) and attempting to raise her roof for a more usable third floor.
ReplyDeleteHello Iris, I love the idea of adding or make overs on these kits. It is great to make room to stuff more mini's in them. Love it all!
ReplyDeleteMany hugs and kisses, conny
This looks like a wonderful addition to the house, Iris! I know what you mean about it not being as simple as you thought it would be.... that's the story of My Life!!! LOL! It is really nice to see the whole house with the new addition! Keep up the Great work! ( Or should I say the "slate" work!!)
ReplyDelete