While I always thought that
2004 Oddjob Lane was charming straight from the box, I also always thought that I could maybe "add something to it". (This dollhouse was purchased at
Odd Job Stores -- now out of business). It was a completed house just needing putting together.
 |
| Original enamel painted house. |
I considered, and rejected a number of changes: add 2 inches to the back of the house (the rooms are only 11 1/2 inches deep); add an addition with a covered porch on the ground floor and an extension to the living room on the first floor; change the roof line to a true hip roof and add a room in the attic; and some others. Only the roof change is still in the running.
About a month ago, I knew what the house needed--a more elegant exterior!
- Stucco exterior. I used a "sand grout with glue" in Alabaster from Home Depot. This stuff goes on easily and stuck without any problem on a glossy enamel paint without sanding. Beware, though, this stuff dries hard; then corrections are almost impossible to make. The problems I had were that I could not remove the quoins, windows, nor other trim to make stucco-ing easy. Thus the finish is not exactly as smooth as I would have liked; but I am still pleased.
- Quoins and balusters. I painted these with Duncan stone texture paint in Sand color. This color was too dominate for the stucco color so I gave them a wash of white paint (actually a couple of washes) to tone the color down.
- Brickwork. The foundation of the house, full-height chimneys, the step risers, and the walkway were painted with DecoArt stone texture paint in Light Brown (really a red-brown). After it dried, I scored those areas (the house is MDF) into bricks. I could not score the chimneys. I used 1/2 inch x 3 inch pine and I had to score against the grain and it didn't work. So, brick chimneys are still up for grabs. If worse comes to worst, I will leave them as "brick-colored stucco".
- Porch and step treads. I painted these with DecoArt stone texture paint in Grey
- All the white enamel trim was repainted with a soft-white flat (real house) paint I had on-hand.
- Landscaping. I am using (because I had it at home) green craft styrofoam as the "form". The grass areas will be covered with either Heiki or Noch grass mat. I haven't work out the landscape design yet.
- The roof will be redone as a Georgian hip roof with one or two rooms in the attic.
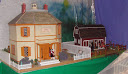
 |
| The new look! |
 |
| Closeup of porch and brickwork. |


I can't believe the improvement of the exterior. You have a great eye.
ReplyDeleteThanks, I have to admit that I was amazed with how well the "new look" turned out. It's one thing thinking something should work out, and another actually having it happen!
ReplyDeleteHello Iris,
ReplyDeleteI like the exterior of this house. It all melds together. I especially love the double black doors!
The dollhouse that I bought is too flat looking on the outside. I might try this with my dollhouse if you do not mind.
Many hugs and kisses,
conny
Hi Conny,
DeletePlease use any ideas that you like. I'm glad you like the look of this house. I was impressed what a big difference it made and I still have the same charming dollhouse that I fell in love with in the store!