


This build started in the winter of 2007. When I was looking for a home for the MacPhersons, I realized that I could now build a plantation house style (aka “Southern Colonial” -- Tara is a good example of this style).
As soon as I bought “Angus”, I knew that he lived in this type of house and that he raised Saddlebred horses. I also knew that he worked for the CIA (but that’s another story). I had already built an elaborate Georgian (The Big G) so I didn’t want anything of that scale, and I didn’t even want a hint of Palladian. The MacPhersons are a casual folk.
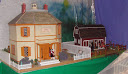
I researched real houses and found a great range of stunning plantation houses. I kept looking and finally found a very nice "homey" style. The following picture is the model I am using for the exterior of Mac pherson Farm.

I bought an Earth & Tree Hancock 3/8 " birch plywood kit to turn into a front-opening house. When I unpacked the kit, I realized that the dimensions were not what I thought they would be and some of the wood was warped. This, plus the bashing that I had planned to do: front-opening with different size windows and doors than the cut-outs, and expanding the attic, made me realize that I should have scratch-built. I decide to go ahead and simply bash it into what I wanted. Big mistake! As a result, not very much of the original remains and I had a lot more work this way. My husband and sister kept saying to start from scratch, but I didn’t listen. We like the way the house is turning out, but it has been a discouraging build.
I decided to build a six-room house since I was tired of doing kitchens and bathrooms. The interior is a basic center hall colonial with living room and dining room on the first floor, 2 bedrooms on the second, and an expanded attic with a den for really relaxing and a “collections” room for rare books and objects
 .
.As with all best laid plans, my sister decided to build an addition: a ground-floor kitchen, and a 2nd floor bathroom and dressing room for Celestine! This is on the dining room side of the house and is a separate unit just pushed against the main house. So much for just a six room build.


Design Features:
This is a front-opening dollhouse. The front section (with 2-story porch and its roof) pulls away from the house in one 36” section and turned out to be heavier than I thought. The attic roof flips up. The house is electrified by pulling the wires of the lights under the flooring or straight out the back and plugged into a power strip attached to a transformer. This method needs no tape wire – me hates tape wire!
The house exterior is brick – but a simple and inexpensive way. I bought Handley House brick sheets and sprayed them with Fleck-Stone “Fiesta”. This gave them a wonderful color and texture! The house has a wood shake roof. The chimneys use a form made of builder’s foam insulation and then covered with the brick sheets. These were very hard to use around the chimneys. Actually, it was a mess and I wouldn't use this method again! All the windows and doors open.
To have the floor space I wanted in the first floor hall, I cut off two steps of the staircase and turned the straight run staircase into an “L”. I also added a niche in the dining room for a wonderful Reutter breakfront. To have more room in the fireplace fireboxes, I cut openings in the walls to give depth. For the first floor flooring, I made patterns with parquet and regular wood flooring sheets.
To have good sized rooms in the attic, I added a long back dormer with an 8" back wall. Also, to have the roof come down over the porch, I increased the height of the peak and increased the length of the main section. This hinged roof section comes down over the static roof section of the porch.
The pull-away front includes the entire 2-story porch section. The porch will have steps. The porch was a bit complicated to make. I did measure and sketch it out, but it still needed adjustment as I was building!
The kitchen addition is a separate section with a flat, walk-out roof. The front is also a pull-away section. Since this was a late-comer, to make internal doorways easier, I used faux connecting doors.
=-=-=-November 25, 2010-=-=-=
I thought I should add a long-overdue comment on this house: I am still working on it! I took almost a year off from it due to other demands on my time. As a result, now that I have time again, I have to remember what I wanted to do and what I have to still think about doing, such as how to build the "pull-away" front and steps for the addition. Also, some thinking is still needed for the front of the main house.
I do have the electricity working in the house (except for the attic) and in the the addition. The rooms have all their furniture and incidentals-- except for Celestine's dressing room where I am fighting with little clothes and little hangers! There is even a pre-Christmas party going on inside the house!
A note about electricity:
Having the wires connect to power strips beings a problem since one power strip can only handle 20 bulbs. This house will need two to three power strips and they all will connect to one 40-watt transformer (the transformer can light up to 60bulbs); therefore, I will need an electrical connector block into which I will connect the transformer and the power strips. I am also considering making my own "power strip" from 1in x 3 in pine, lay down tape wire, put in grommets for the plugs, add a junction splice, and connect the transformer to that. Then I will not need any commercial power strips.
I like your house ideas. I agree sometimes kits go bad. The house looks very nice in spite of all the problems.
ReplyDelete