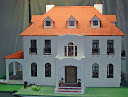
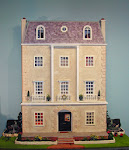
It All Starts Here

Sometimes our ideas flow from an existing kit to bash, a house style to scratch (aka custom) build, or from an interesting doll who needs a place to live. Our settings are always modern-day (ca. 2001 when we started this hobby). We try to create things that will make people smile and feel good.

We think that if we had to build the same house twice, we literally could not do it! Fortunately, we have very unique little people who have definite opinions and so far, no one has wanted a house “like so-and-so” has.

We work as a family unit: my wonderful husband, my beautiful sister, and I. We don't always agree as to the direction of the build, but I think that we end up with a better dollhouse because of all our grumblings -- and we do have a lot of fun!

The Purpose of this Blog

We needed a place for all we wanted to say about the background of the build and the nuts and bolts of the design and build process. Thus this blog.

All our dolls' homes have families living in them and a story is built around their personalities and lifestyles. This story is an integral part of our building process. We would like to share these stories -- actually, the little people insist upon it!

Many of our houses are located in Fredericksburg, Virginia because that is my sister's favorite place.

Also, we have started a Rouges' Gallery with photos of our little people and information about the dolls.

If you would like to start with the dollhouse that "started it all", it is the Original Rowbottom Manse; if you would like to see the scratch-built Georgian that our first build gave us the confidence (or fool-hardiness) to do, it is Sunnybrook Farm.

Let the stories begin!

~~~~~~~~~~~~~~~~~~~~~~~~~~~~~~~~~~~~~~~~ ~~~~~~~~~~~~~~~~~~~~~~~~~~~~~~~~~~~~~~~~

Friday, June 29, 2012

Swinging from the Chandeliers at La Malcontenta


The Living Room Chandelier:
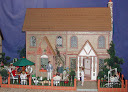
Living room with new Clare-Bell chandelier! Hallelujah!! The former owner of the house, Elsa Martinelli MacPherson, is on the left and talking to her friend Madeleine Duvall.
What a mess with the original chandelier. The sticky pad with it did not hold. This did not surprise me as I had not have success with these on chandeliers. What did surprise me was the extent of the problems with the chandelier when I investigated to find a way to glue it to the ceiling.

The first thing I discovered when I removed the sticky pad was that the electrical wiring was a “lump” that was higher than the edge of the canopy (disguised by the thickness of the pad)! So now I looked for something to glue to the edge of the canopy to make it higher than the “lump” for a flat surface against the ceiling.

As I was doing this, I discovered that depending on the view of the chandelier, the “arms” looked uneven – because they were! Well, nothing I could do could change this! As I was pondering, I decided to check that with all my machinations, the light still lit. Hallelujah, I could stop investigating—the light no longer lit! I considered this the best news in a bad situation. Surrender, and look for a different chandelier!

The disaster of a living room chandelier was replaced by one from Clare-Bell. I like their items and through the years I have been slowly acquiring their lights. They do not sell on their website but I have found a vendor New England Miniatures who can get them all.
Close-up of the Clare-Bell chandelier in the living room.
So  ....  the living room that I thought was finished is now really finished! The chandelier is hung and bradded into the electrical system and looks great, and I don’t want to hear about any other problems!

The Den Chandelier:
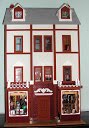
Finished den with the new Clare-bell chandelier. Cecelia Randolph is talking with her brother Tom.
The den has its official chandelier and a brass floor “bridge lamp”, both from Clare-Bell and two Miniature House (Aztec) antique bronze table lamps. One existing table lamp remains—a wonderful Art Deco lamp from Brooke Tucker—on the buffet on the right.

Clare-Bell chandelier and brass "bridge" lamp, and Aztec antique bronze table lamp.
Brooke Tucker table lamp. Buffet by Bespaq.
All the ancestor portraits are hung.
Ancester portraits, fireplace, etc..  David MacPherson, the former owner of La Malcontenta, is on the left, and his son Daniel the current owner is on the right. On the left also, is  Pollyanna Whitier a friend of the family.
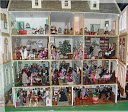
For some reason, I had difficulty getting the den into “shape”. Finally, it is pulled together and I am exhausted!

The Attic Rooms:
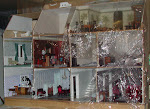
I know that I have not talked too much about the attic rooms—a pied-a-terre for Arabella’s brother Tom, and the nursery for the MacPherson daughters Francesca and Annabelle, so here are some pictures:
Attic with pied-a-terre and nursery.

Tom's pied-a-terre.

Tom likes to travel and collect things.

The nursery playroom with Francesca, Annabelle, and nanny Mildred.

The nursery bedroom. Foggy, the family's Old English Sheepdog, wanted his picture taken too!
~~~~~~~~~~~~~~~~~~~~~~~~~~~~~~~~~~
~~~~~~~~~~~~~~~~~~~~~~~~~~~~~~~~~~

Well, my friends, the interior of La Malcontenta, is finished, except for the little curios and what-nots that get added to all houses, real and otherwise, through the years.

I am working on a video for the interior of La Malcontenta. I thought I would have it finished by now, but I have finally been spending a lot of time in my garden! The weather has improved and the deluges are down to a minimum and now a big 4th of July week is coming up, so I guess it will have to wait a bit more.

The details of this dollhouse, as with all my houses, are spread over a couple of years and about a million posts. I decided, now that I am ‘into’ making videos, the best method for viewing the “completed” houses is through individual videos (or slide shows). There won’t be any voice-over, just some background music (I hope) and the highlights of the interior. Since the landscaping at La Malcontenta is not finished, that will be in a future separate video.

Also, if any of you are interested in the biographies (all the scoop) of the MacPherson family, it is in the post: La Malcontenta, the Spanish Eclectic-Art Deco Home of Arabella & Daniel MacPherson. Georgetown, DC

~~~~~~~~~~~~~~~~~~~~~~~~~~~~~~~~~~~~~~~

Well, I guess it is time to get back to “poor Fred’s” workshop at Sunnybrook Farm! Or maybe I will just garden! Wasn’t there a song many years back about “See you in September”?

Wednesday, June 13, 2012

Dining Room Glitzy & Complete!- La Malcontenta


DIning room is finished!
The Dining Room:
I finally finished the dining room (well, I still have to find/make casement window hardware, but that’s IT). I know it’s hard to believe! (The kitchen is also "finished" and is discussed here also.)

I am very pleased with the finished room, but as I looked at it, I am not sure which of the house style description, Art-Deco Spanish Eclectic, applies here, hmmm … ! It’s a good thing I added “eclectic” to the style because I think that that is the only one that fits!

Oh well, what’s in a name? Anyway, come in and dine at La Malcontenta.

Ionic Columns—
Flanking the archway are "cake columns" from the baking supply section of a craft store and are painted Delta Creamcoat Eggshell—cheap and effective!

I wanted to “frame” the arch itself with moulding and I found a resin moulding by Unique Miniatures that looked just right. Unfortunately, I could heat it but I could not bend it properly and it kept breaking. Knowing when to move on, I looked for something I could “bend”. While roaming through a craft store, I came upon just that—a thin cording in just about the right color! I glued two rows around the arch. Et voilà, my version of curved moulding, and just a bit of “glitz”.

Furniture—
I didn’t add any new furniture since the previous post about this room, but I did move the table and rug from being diagonal in the room to straight. I don’t even remember why I made it diagonal. The rug is copy of an antique rug. The furniture (except the console tables) is by Bespaq.

--Stone and Glass Demi Console Tables
I wanted to flank the archway with two tables but I couldn’t find anything I liked, so I made my own.
Stone console tables
The “stone” bases are from Dolls’ House Emporium and the clear “glass” tops are made from a clear acrylic hexagon I bought at a craft store. I cut the hexagon in half with my band saw and glued the halves to the bases. The paintings above them are from Velveetasuzee on eBay. Since I had bright red roses on the table and a red chinoiserie cabinet between the windows, I wanted to add some more red touches. The items on the tables are from a dollhouse shop.

Fireplace—
The fireplace is from Unique Miniatures. I painted and glazed it to look like marble with Delta Creamcoat Light Ivory, Antique White, and Gold, and did the same for the hearth. To add depth to the firebox, I cut out a section of the wall and made a larger firebox with sandpaper bricks and textured paint. The fire fender is decorated with two griffins.

--Fireplace Wall
Here, blue and white Chinese-style ceramics are placed upon acanthus leaf brackets from Unique Miniatures. I had to add a small semi-circular thin wooden platform for the vases since their bases were larger than the “leaf". The brackets are painted Delta Creamcoat Ivory.
Fireplace and wall treatment with oriental vases and sconces
Flooring—
This used to be a marble made from a vinyl shelf lining. I didn’t like it when I finished it but my sister did, so I left it alone, after all, it was done. But now that I was about to do all the finishing touches, I rethought a number of things about the room. Yup, the flooring had to go!

I couldn’t find, nor paint up a marble I liked. I did find a nice “stone”- look real house vinyl wall paper in my collection so I decided to go with a stone floor instead. I cut the wallpaper into 1 inch squares and glued them onto a medium weight poster board with UHU glue stick (I have become a great fan of UHU glue sticks). Then I used spackle as grout. When all was dry and cleaned up, I gave the flooring three coats of satin varnish. I took some photos of the flooring, but it doesn’t really show up well—but take my word for it—this is very nice and about 1000% better than the other flooring!

"Stone" flooring
The rug is a copy of an antique real rug.

 Artwork—
On the front wall, are three wood block prints from a dollhouse shop, and on the “door” wall is a Renoir copy from Dollhouse_Cottage on eBay.
Renoir-I like the blue and white colors matching the vases.
Other—
The ceiling is textured real house wall paper from Home Depot. The walls and the very narrow crown molding are painted Delta Creamcoat light Ivory. The wall paper is by Brodnax. The windows were made by us. I am still looking for the right casement window hardware. The chandelier is by Cir-Kit Concepts.

Any other items not mentioned were found in various dollhouse shops.

~~~~~~~~~~~~~~~~~~~~~~~~~~~~~~~~~~~~~~~~~
~~~~~~~~~~~~~~~~~~~~~~~~~~~~~~~~~~~~~~~~~
Dining Room Inspiration:
The inspiration for many elements in this room came from Ray Whitledge’s Morning Splendor. I saved this photo from Miniature Collector magazine many years ago. It just took my breath away when I saw it (and it still does).
Morning Splendor by Ray Whitledge
By the way, Ray is doing a Chessington Plaza Conversion (a Lawbre dollhouse) and you can follow this exciting blog here.
~~~~~~~~~~~~~~~~~~~~~~~~~~~~~~~~~~~~~~~~~


The Kitchen:
I still can’t believe that we increased the size of the kitchen by such a small amount when we were building the house! Anyway, we now live with it!

I have tried to give the room a Spanish/Mexican flavor, combined with my favorite kitchen decorations—roosters and chickens.

The beams on the ceiling were an afterthought when I realized that I needed a way to get the ceiling light electrical wire out the back of the house. (Wiring in this house is bradded into tape wire attached to the back.)
The cook Clara Cousins relaxes and has a chat with her friend Philippa Scott.
 Flooring—
The flooring is real cork from a craft store. I like it except the front edge refused to stay glued flat no matter what glue I used and how many bricks I used as weights! It is almost flat, but not entirely. I have given up for the moment so I can move on. I have coated it with two coats of satin varnish.

My sister found the neat fruit rug at her dollhouse shop.

Walls –
The walls are painted a quiet yellow from a can of OOPS paint from Home Depot. I painted over the “color” name, so I don’t know what it is, but it’s cheerful. The dado is painted Delta Creamcoat Calypso Orange. The tiles are the plasticized paper, Seixas Tile Flooring Sheet, #23111, sold by HBS. I added a shelf with chickens above the dado by the table.
Chickens on the wall and on the table, and a rooster on the floor.
This wall needs some pictures that I haven’t found yet in miniature. I did see some wonderful full-size paintings in a local Mexican restaurant, but that doesn’t help.

Furnishings—
The “wrought iron” table is #77434, the Monterey Table set from HBS. The appliances are from my endless stash of kitchen appliances. The hood over the stove is poster board covered with some of the tiles.

The extra kitchen base cabinet is a cut-down hutch from Michaels and painted white gloss enamel. Gluing it to the door was the only place left in this tiny kitchen, but it looks good there. (I still haven’t decided on a design for the curved moulding around the arch of the exterior door.)
The only place left in the kitchen for more work space!
Other items—
We find interesting items here and there and often don’t remember where, unfortunately.

Thursday, June 7, 2012

A Very UN-Merry Month of May!

New Clare-Bell chandelier for La Malcontenta's living room

I just had the most topsy, turvy month in a long time. Things are sort-of getting better and I am coming out of hiding to join the “little people“ again. I didn’t have much time nor the energy to do any miniature work, I didn’t add any posts to my blog, and worst of all, I didn’t get to read any of your posts! I know you were all doing wonderful things and I missed it all—I have a lot of catch-up reading to do. I hope your May was better than mine. Next year, I am removing May from my calendar!

I have been back to La Malcontenta to finish the interior. Things are going fairly well, except for the disaster with the living room chandelier. I will tell you about that in a future post—but the result is that I am getting a new chandelier for the living room since I just couldn’t cope with the original chandelier’s problems, and some of them were not fixable anyway! I ordered a wonderful chandelier by Clare-Bell. I do like their lights. They didn’t have it in stock, so it will be a couple of weeks before I get it

I don’t have anything more to say, except that I am still here and on the job again! I should have a post for the completed (yes, completed!) La Malcontenta dining room within a week. I am really excited about how it all turned out. Thank you friends for bearing with me! I missed you all--life is really a bummer when there is no time for miniatures nor my blog-friends! -- And just when I was getting into, and enjoying making You Tube videos!